


Table of contents
Large images increase the amount of data a page needs to load, especially on a slow connection. To optimise images on a Joomla website, choose suitable pixel dimensions and a file format, then check the compression quality. This guide explains how to find large files, prepare images before uploading them and use Joomla's built-in tools.
Find images worth optimising
Start with pages that matter to your visitors: the home page, popular articles, categories and product pages. Check the images the browser actually loads.
In Chrome, you can do this with the developer tools:
- Open a page on your website and press F12.
- Open the Network tab.
- Enable Disable cache so the browser does not use its cache during the check. This setting applies while the developer tools are open.
- Select the Img filter and reload the page.
- Sort requests by the Size column.
- Scroll down the page to load images that use lazy loading.
Open the largest requests and check which files are being used. For example, a photo that is 4000 pixels wide may appear in a small card. Scaling it down with CSS changes its size on screen, but the browser still downloads the original file.
PageSpeed Insights can help with a broader assessment. Its recommendations highlight oversized images and inefficient encoding. Potential savings are an estimate to investigate, rather than a guaranteed result.
Distinguish the file size on disk from the amount transferred in a network request. Response headers and caching affect the figures shown in browser tools.
Choose dimensions and a format
Choose image dimensions for the intended use. An article cover, a list thumbnail and a photo opened at full size may need different versions of the same file.
If an image is displayed at a width of 800 CSS pixels, a screen with a 2× pixel density may need a version around 1600 pixels wide. This is an example calculation, rather than a universal setting for every image on the website.
You can provide several versions for different screens with srcset and sizes. Creating and displaying them depends on your template or extension. Uploading an image to the Joomla Media Manager alone does not mean that the website will generate and serve all the required versions.
| Format | When to use it | What to consider |
|---|---|---|
| JPEG | Photos and images without transparency | Uses lossy compression. Repeatedly saving with lossy compression can reduce quality |
| PNG | Screenshots, diagrams and images with transparency | Uses lossless compression, but photos are often large. Reducing the palette can change the image |
| WebP | Photos, illustrations and images with transparency | Supports lossy and lossless compression, as well as animation. Compare the result with the original |
| AVIF | Photos and illustrations when supported by your website's tools | Can produce a small file at good quality. Server-side processing requires format support |
| GIF | Simple animation | The palette and frames can be optimised. For complex animation, compare it with animated WebP or video |
| SVG | Logos, icons and vector diagrams | Scales well, but does not replace raster photographs |
WebP and AVIF are not necessarily smaller than every JPEG or PNG. The result depends on the image, quality settings and encoder.
Renaming photo.jpg to photo.webp does not change its format. To convert it, export or process the file with a tool that actually creates WebP.
Prepare an image before uploading it
For individual articles, it is usually easier to optimise images before uploading them to Joomla. This gives you control over quality and avoids storing unnecessarily large originals on the website.
Use this workflow:
- Keep the original file separately.
- Crop away unwanted areas.
- Reduce the pixel dimensions to suit the intended placement.
- Export the image in a suitable format.
- Adjust the compression quality.
- Compare the result with the original and check the file size.
Review the image at 100% zoom and at the size it will appear on the page. In photos, check fine detail and smooth colour gradients. In screenshots, check text legibility, thin lines and sharp edges. If transparency is required, make sure the background has been preserved correctly.
The same quality value in different applications and formats does not guarantee the same result. Judge the image itself as well as the number in the settings.
Resize an image in the Joomla Media Manager
The built-in Media Manager lets you reduce the dimensions of an image that has already been uploaded. The screenshots below show Joomla 6.1.3.
Keep a copy of the original before editing: saving changes in the editor replaces the image being edited.
- Open Content → Media.
- Find the image.
- Open its actions and choose to edit it.
- Open the Resize tab.
- Enter a width, then move to another field so the height is recalculated.
- Check the dimensions and click Save & Close.
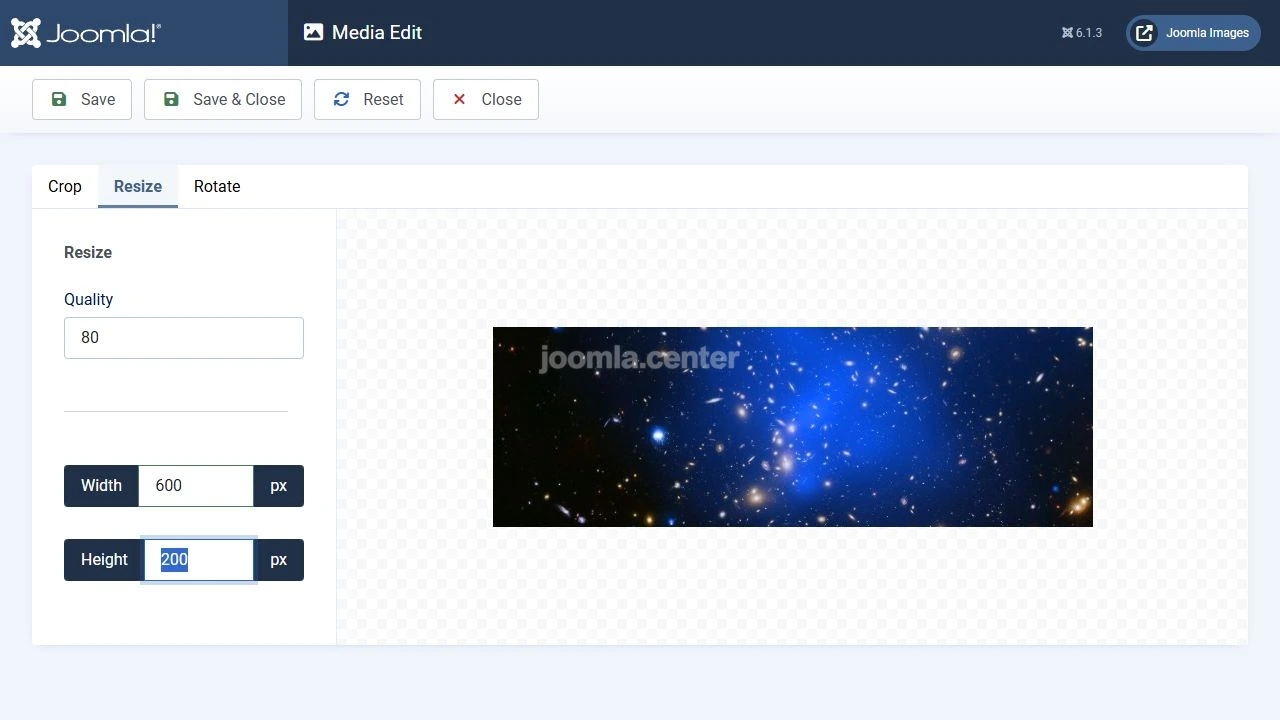
After saving, check both the pixel dimensions and the file size. Resizing and compression are related operations, but they do different jobs. Re-encoding can produce an unexpected result.
Limit the dimensions of new uploads
You can set automatic dimension limits for images uploaded through the standard Media Manager.
- Open System → Plugins.
- Find the Media Action - Resize plugin.
- Make sure it is enabled.
- Open the Batch Settings tab.
- Set the maximum width and height.
- Save the settings and upload a test image.
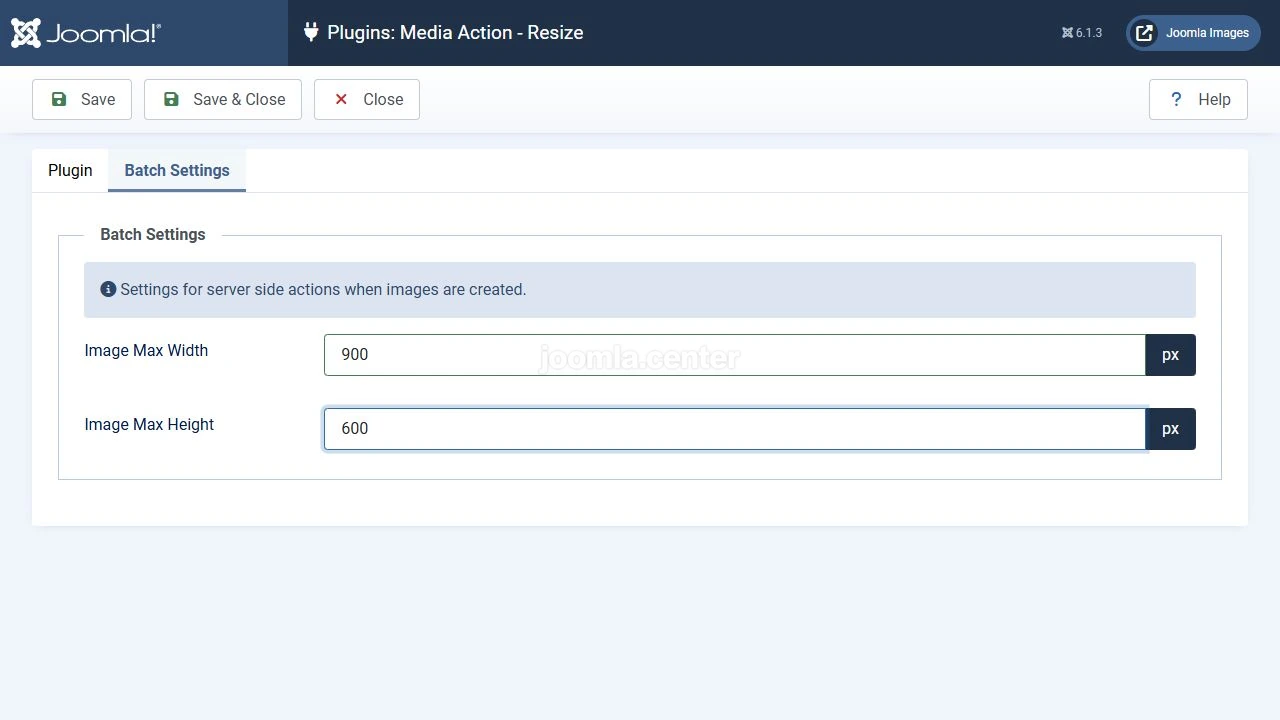
These values define the boundaries the image must fit within. They do not mean that every image will become exactly 900 × 600 pixels. The aspect ratio is preserved. In our example, a 1200 × 400 pixel original became 900 × 300 pixels after uploading.
Choose limits that suit your website's images. A value that is too small can reduce the quality of large covers or photos intended to be opened at a larger size.
This setting does not start a batch operation on existing files. It also does not guarantee processing of images uploaded through FTP or a third-party extension's own uploader.
| Version | Dimensions | File size |
|---|---|---|
| Original JPEG | 1200 × 400 | 66.84 KiB |
| After manual resizing | 600 × 200 | 31.69 KiB |
| After automatic resizing on upload | 900 × 300 | 174.25 KiB |
In this test, automatic resizing reduced the pixel dimensions but increased the file size. This can happen when an already compressed image is re-encoded. These figures apply to this particular file and test environment, but they show why checking the result matters.
When to use an optimisation extension
If your website contains hundreds of images, manual processing becomes inconvenient. An extension with batch optimisation, backups and restoration can help.
For example, JCH Optimize offers image processing in its paid Pro edition. The Optimize Images tool is part of the component and lets you select images by page or directory. Processing uses the developer's external service, so the selected images are sent to that service.
Before processing a large batch:
- back up the files
- process a small selection of images
- compare image quality and file sizes
- check how they appear on your pages
- make sure you can restore the originals
A WebP generation feature does not by itself mean that visitors receive WebP. After configuring it, check the actual URL and format of the image loaded in the browser.
Check compatibility, available features and licence terms for the version of the extension you choose.
Check the images on your website
After processing, open the pages that use the changed files. If the file name or extension has changed, update the links in articles, modules and other places where the image is used.
Check the result on a computer and a phone:
- images load and retain the correct proportions
- text in screenshots is legible
- transparency and colours look correct
- the browser loads the intended file
- thumbnails and enlarged images work
- the amount of data downloaded has actually decreased
If the website still shows an old image, check the Joomla, extension and CDN caches. Some components generate their own thumbnails, which may need updating separately.
Providing correct width and height attributes helps the browser reserve space for an image and reduce layout shifts during loading.
Use lazy loading for images below the first screen. The main image on the first screen, especially when it is the LCP element, should not be delayed with loading="lazy".
Repeat the Network and PageSpeed Insights checks under comparable conditions. A smaller file reduces the amount of data transferred, but the time it takes for the main content to appear also depends on the server response, template, styles, JavaScript and resource loading order.
Where to start
Start with the largest images on popular pages. Choose dimensions that suit their placement, compare formats and quality, then check the result in the browser.
For new content, prepare images before uploading them. Joomla's built-in tools help with resizing and limiting new uploads, while extensions can process larger collections. In every case, aim for suitable dimensions, acceptable image quality and a measurable reduction in file size.
Terms used:
Media Manager, CSS, JavaScript, JCH Optimize, URL, Caching, CDN, WebP and AVIF, Layout


